Are you tired of waiting for your Windows computer to load programs and applications? Look no further – ReadyBoost is here to save the day! In this comprehensive guide, we’ll take you through everything you need to know about ReadyBoost for Windows, from A to Z.
What is ReadyBoost?
ReadyBoost is a built-in feature in Windows that allows you to use a USB flash drive or SD card as additional RAM, giving your computer a significant boost in speed and performance. When your computer is running low on memory, ReadyBoost uses the free space on your USB drive or SD card to store frequently accessed data, reducing the need to access the slower hard drive. This results in faster load times for applications and programs, improving overall system performance.
How does ReadyBoost work?
ReadyBoost works by creating a cache of frequently used data on the USB drive or SD card. When you launch an application or open a file, Windows checks if the data is already stored in the cache. If it is, the data is retrieved from the cache, which is much faster than retrieving it from the hard drive. If the data is not in the cache, it is retrieved from the hard drive as usual, but the cache is updated with the new data for future use.
Benefits of using ReadyBoost
There are several benefits to using ReadyBoost on your Windows computer. Firstly, it can significantly improve the speed and performance of your system, especially if you have limited RAM. By utilizing the additional storage space on your USB drive or SD card as virtual memory, ReadyBoost reduces the need for your computer to access the slower hard drive, resulting in faster load times for applications and programs.
Secondly, ReadyBoost is an excellent solution for older computers that may not have the option to upgrade the RAM. Instead of investing in costly hardware upgrades, you can simply plug in a USB drive or insert an SD card and instantly boost your system’s performance. This makes ReadyBoost a cost-effective alternative for those looking to enhance their computer’s capabilities without breaking the bank.
System requirements for ReadyBoost
Before you dive into using ReadyBoost, it’s essential to check if your computer meets the necessary requirements. Firstly, your computer must be running Windows Vista or a later version of Windows, as ReadyBoost is not available on older operating systems.
Secondly, you need to have a USB drive or SD card with at least 256MB of free space. However, it is recommended to have a device with at least 4GB of free space to see noticeable improvements in performance. The device must also be at least USB 2.0 or higher for optimal performance.
Enabling and configuring ReadyBoost on Windows
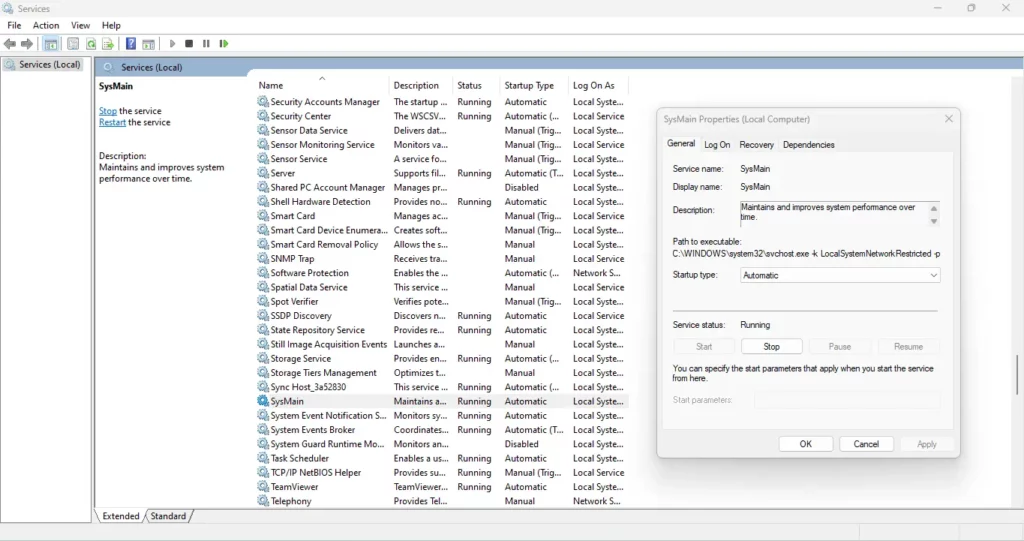
Enabling/Disabling SysMain in Windows 11:
Press Win+R to open Run.
Type services.msc and press Enter.
Locate “SysMain” service, right-click and choose:
Start: to enable
Stop: to disable
Properties: to change startup type (Automatic, Manual, Disabled) and recovery options.
Enabling ReadyBoost on your Windows computer is a straightforward process. Here’s how you can do it:
- Connect your USB drive or insert your SD card into your computer.
- Open File Explorer and right-click on the drive you want to use for ReadyBoost.
- Select “Properties” from the context menu and navigate to the “ReadyBoost” tab.
- Check the box that says “Use this device” and adjust the slider to allocate the desired amount of space for ReadyBoost.
- Click “Apply” and then “OK” to save the changes.
Once ReadyBoost is enabled, Windows will start utilizing the USB drive or SD card as additional RAM, improving your system’s performance. It’s important to note that the amount of space you allocate for ReadyBoost should be based on the available free space on your USB drive or SD card. Allocating too much space can lead to slower performance, so it’s best to strike a balance.
Limitations and considerations of using ReadyBoost
While ReadyBoost can provide a significant boost in system performance, it’s essential to understand its limitations and considerations. Firstly, ReadyBoost is most effective on systems with limited RAM. If your computer already has ample RAM, the impact of ReadyBoost may not be as noticeable.
Additionally, ReadyBoost is not a substitute for upgrading your computer’s RAM. While it can enhance performance, it cannot match the speed and efficiency of physical RAM. If your computer is running extremely slow or struggling with resource-intensive tasks, upgrading the RAM should be your primary solution.
Tips for optimizing ReadyBoost performance
To get the most out of ReadyBoost, here are some tips to optimize its performance:
- Use a high-speed USB drive or SD card: The faster the device, the better the performance. Look for USB 3.0 or higher drives or SD cards with fast read and write speeds.
- Keep the ReadyBoost device connected: For ReadyBoost to work effectively, the USB drive or SD card must remain connected to your computer. Removing it will result in a loss of performance until it’s connected again.
- Use a dedicated ReadyBoost device: Avoid using the same USB drive or SD card for other purposes while it’s being used for ReadyBoost. This ensures that the cache remains intact and doesn’t get overwritten.
Alternatives to ReadyBoost for improving system performance
While ReadyBoost can be a fantastic tool for boosting your system’s performance, there are alternative methods you can explore. Upgrading your computer’s RAM is one of the most effective ways to improve performance, as it provides more physical memory for your system to work with.
Another option is to optimize your computer’s settings and remove unnecessary startup programs and background processes. By reducing the load on your system, you can free up resources and improve overall performance.
Common troubleshooting issues with ReadyBoost
In some cases, you may encounter issues or errors when using ReadyBoost. Here are some common troubleshooting tips to help you resolve them:
- Ensure your USB drive or SD card is compatible: Not all devices are compatible with ReadyBoost. Make sure your device meets the system requirements mentioned earlier.
- Check for hardware issues: If ReadyBoost is not working correctly, try using a different USB drive or SD card to rule out any hardware issues.
- Update your device drivers: Outdated device drivers can cause compatibility issues with ReadyBoost. Make sure all your drivers are up to date.
Conclusion
Don’t let slow load times get in the way of your productivity – discover the power of ReadyBoost and supercharge your Windows experience today! In this guide, we’ve covered everything you need to know about ReadyBoost, from what it is and how it works to the benefits, system requirements, and tips for optimizing its performance. Whether you have limited RAM or simply want to enhance your computer’s capabilities, ReadyBoost is a valuable tool that can significantly improve your Windows experience. Give it a try and enjoy a faster, more efficient computing experience.
More Articles
Windows 11: https://spca.education/windows-11/
Microsoft Learn: https://learn.microsoft.com/en-us/