Are you ready to create your own domain on Windows Server 2019 or 2022? Look no further! In this step-by-step guide, we’ll walk you through the process of domain creation and ensure you have a clear understanding of each stage. Whether you’re a beginner or an experienced user, this article will provide you with all the necessary information to successfully set up your domain on these versions of Windows Server.
From installing the operating system to configuring the domain controller and adding users, we’ll cover it all. Our easy-to-follow instructions will help you navigate through the process seamlessly, ensuring a smooth and hassle-free domain creation experience.
With Windows Server being the preferred choice for many organizations, mastering the domain creation process is essential for IT professionals and system administrators. By the end of this article, you’ll have the knowledge and confidence to create your own domain on Windows Server 2019 or 2022.
Get ready to take your Windows Server skills to the next level as we guide you through this step-by-step domain creation process. Let’s get started and unlock the potential of your server!
Understanding the Importance of Domains in a Windows Server Environment
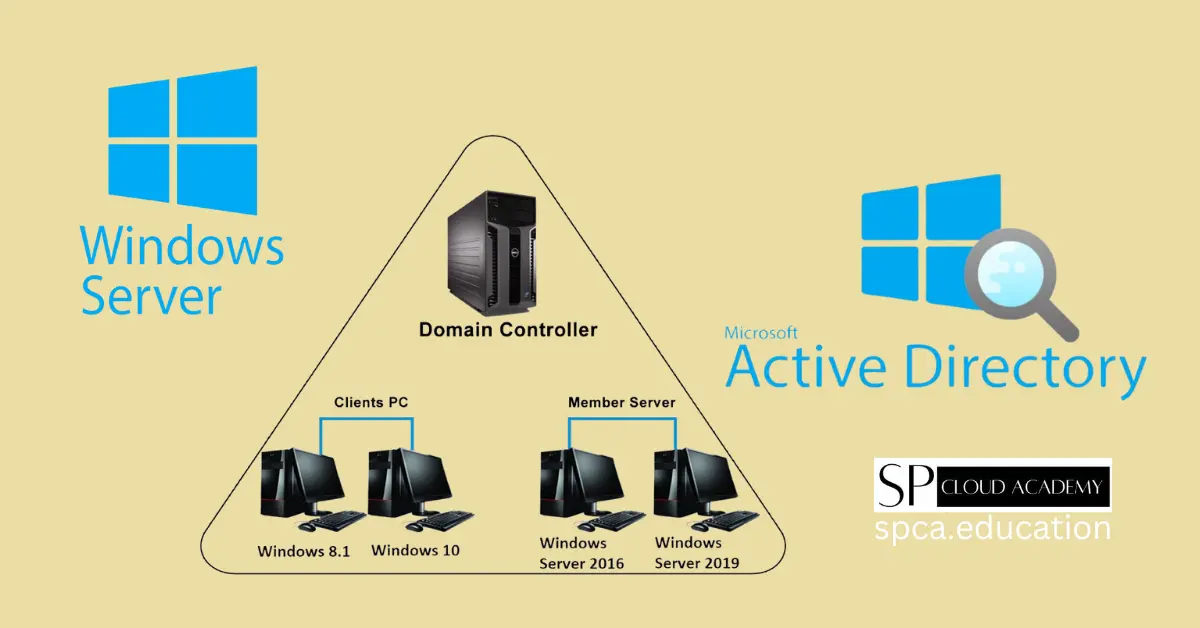
Domains play a crucial role in a Windows Server environment. They provide a centralized and organized way to manage users, computers, and resources within a network. By creating a domain, you can establish a secure and scalable infrastructure where users can log in using their domain credentials and access shared resources. Domains also enable you to implement security policies, manage permissions, and simplify administration tasks.
When you create a domain, you create a logical boundary that defines the scope of your network. This boundary allows you to manage users, groups, and computers within a specific domain, providing a level of control and security. Domains also enable you to establish trust relationships with other domains, allowing users from different domains to access shared resources.
To ensure a successful domain creation process, it’s essential to understand the concepts and benefits associated with domains. By grasping the fundamental principles, you’ll be better equipped to plan and execute the domain creation process on Windows Server 2019 or 2022.
Preparing for Domain Creation
Before diving into the domain creation process, it’s crucial to make the necessary preparations. This step ensures a smooth and efficient domain setup and avoids potential pitfalls along the way.
The first step in preparing for domain creation is to assess the hardware requirements. Windows Server 2019 and 2022 have specific hardware requirements that need to be met for optimal performance. Ensure that your server meets the minimum specifications, including CPU, RAM, and storage capacity. It’s also essential to have a reliable network connection to ensure seamless communication between domain controllers and clients.
Next, gather all the required software and installation media. You’ll need the installation media for Windows Server 2019 or 2022, as well as any additional software or updates that may be necessary during the domain creation process.
It’s also essential to have a clear understanding of your network requirements. Determine the IP addressing scheme, DNS configuration, and network infrastructure necessary for your domain. Planning ahead ensures that your domain is set up correctly and can communicate with other networks seamlessly.
Once you have completed the necessary preparations, you’re ready to move on to the actual domain creation process. Let’s dive into the installation of Windows Server 2019 or 2022.
Installing Windows Server 2019/2022
The first step in creating a domain on Windows Server 2019 or 2022 is to install the operating system. Follow these steps to install Windows Server on your server machine:
- Insert the installation media into the server’s DVD drive or connect a bootable USB drive.
- Power on the server and boot from the installation media. The server may need to be configured to boot from the DVD or USB drive, depending on your hardware.
- Follow the on-screen prompts to select the language, time, and keyboard settings.
- Click “Install Now” to begin the installation process.
- Enter the product key when prompted. This key should be provided with your Windows Server license.
- Select the edition of Windows Server you want to install. Choose either Windows Server 2019 or 2022, depending on your preference.
- Accept the license terms and click “Next.”
- Choose the installation type. For domain creation, select “Custom: Install Windows only (advanced).”
- Select the disk or partition where you want to install Windows Server.
- Follow the on-screen instructions to complete the installation process.
Once the installation is complete, your server will reboot, and you’ll be ready to configure the server roles and features necessary for domain creation. Let’s move on to the next step.
Configuring the Server Roles and Features Necessary for Domain Creation
After installing Windows Server 2019 or 2022, the next step is to configure the server roles and features required for domain creation. These roles and features provide the foundation for the Active Directory Domain Services (AD DS) and enable the server to function as a domain controller.
To configure the server roles and features, follow these steps:
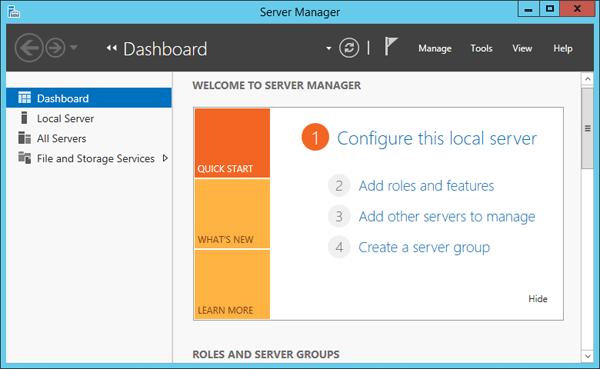
- Open the “Server Manager” by clicking on the corresponding icon in the taskbar or searching for it in the Start menu.
- In the “Server Manager” window, click on “Manage” and select “Add Roles and Features.”
- The “Add Roles and Features Wizard” will open. Click “Next” to proceed.
- Select “Role-based or feature-based installation” and click “Next.”
- Choose the server where you want to install the roles and features. If you have multiple servers, make sure to select the correct one.
- Select the server roles required for domain creation. In this case, select “Active Directory Domain Services.”
- A prompt will appear, asking you to add the required features. Click “Add Features” to include the necessary features for the selected roles.
- Review the additional features and click “Next.”
- The “Active Directory Domain Services” window will open. Read the information provided and click “Next.”
- Review the summary of the roles and features you have selected. If everything looks correct, click “Install” to begin the installation process.
Once the installation is complete, the server will need to be configured as a domain controller. This involves creating the Active Directory Domain Services (AD DS) forest and domain, which we’ll cover in the next sections.
Creating the Active Directory Domain Services (AD DS) Forest
The Active Directory Domain Services (AD DS) forest is the top-level container for your domain. It represents the structure of your organization, including the domains, subdomains, and trust relationships. To create the AD DS forest, follow these steps:
- Open the “Server Manager” and click on “Tools” in the top-right corner. Select “Active Directory Users and Computers” from the drop-down menu.
- In the “Active Directory Users and Computers” window, right-click on “Active Directory Users and Computers” in the left-hand pane and select “Connect to Domain Controller.”
- Choose the appropriate domain controller from the list or enter the name of the server manually. Click “OK” to continue.
- In the left-hand pane, right-click on “Active Directory Users and Computers” and select “New” > “Forest.”
- The “New Object – Forest” window will open. Enter the fully qualified domain name (FQDN) for the forest root domain. For example, if your organization’s domain is “example.com,” enter “example.com” in the “Domain” field.
- Select the desired forest functional level. The functional level determines the features available within the forest. Choose the highest functional level that is compatible with your environment.
- Click “Next” to continue.
- Review the summary of the forest configuration. If everything looks correct, click “Next” to create the AD DS forest.
The AD DS forest will be created, and you’ll be ready to proceed with creating the domain within the forest.
Creating the Active Directory Domain Services (AD DS) Domain
Once the AD DS forest is created, the next step is to create the AD DS domain within the forest. The domain represents a logical group of users, computers, and resources that share the same security policies and administrative authority. To create the AD DS domain, follow these steps:
- In the “Active Directory Users and Computers” window, right-click on the forest root domain (e.g., “example.com”) in the left-hand pane and select “New Domain.”
- The “New Object – Domain” window will open. Enter the name for the domain. For example, if you want to create a domain called “internal.example.com,” enter “internal” in the “Domain” field.
- Select the appropriate domain functional level. The functional level determines the features available within the domain. Choose the highest functional level that is compatible with your environment.
- Review the summary of the domain configuration. If everything looks correct, click “Next” to create the AD DS domain.
The AD DS domain will be created, and you’ll be ready to proceed with adding additional domain controllers for redundancy and fault tolerance.
Adding Additional Domain Controllers for Redundancy and Fault Tolerance
To ensure high availability and fault tolerance, it’s recommended to have multiple domain controllers within your domain. Adding additional domain controllers distributes the workload and provides redundancy in case of a server failure. To add additional domain controllers, follow these steps:
- Open the “Server Manager” and click on “Tools” in the top-right corner. Select “Active Directory Sites and Services” from the drop-down menu.
- In the “Active Directory Sites and Services” window, expand the “Sites” folder and select the site where you want to add the additional domain controller.
- Right-click on the site and select “New” > “NTDS Site Settings.”
- In the “NTDS Site Settings” window, right-click on the site and select “New” > “NTDS Settings.”
- The “New Object – NTDS Settings” window will open. Select the domain controller you want to add from the list or enter the name of the server manually.
- Click “OK” to add the domain controller.
Repeat these steps for each additional domain controller you want to add to the domain. Having multiple domain controllers enhances the reliability and availability of your domain, ensuring uninterrupted access to resources and services.
Configuring DNS for the Domain
DNS (Domain Name System) is a critical component of a domain and plays a crucial role in the resolution of domain names to IP addresses. Configuring DNS for your domain involves setting up the necessary DNS server records and ensuring proper name resolution. To configure DNS for your domain, follow these steps:
- Open the “Server Manager” and click on “Tools” in the top-right corner. Select “DNS” from the drop-down menu.
- In the “DNS Manager” window, expand the server name in the left-hand pane and expand the “Forward Lookup Zones” folder.
- Right-click on the domain name (e.g., “example.com”) and select “New Zone.”
- The “New Zone Wizard” will open. Click “Next” to begin.
- Select the zone type. For a standard primary zone, choose “Primary zone” and click “Next.”
- Enter the name for the zone. This should match the name of your domain (e.g., “example.com”).
- Choose the appropriate zone replication scope. If you have multiple domain controllers, select the desired replication scope.
- Select the appropriate dynamic update settings. The default setting is usually sufficient for most scenarios.
- Review the summary of the zone creation. If everything looks correct, click “Finish” to create the DNS zone.
Once the DNS zone is created, you’ll need to configure the necessary DNS server records, such as host (A) records, alias (CNAME) records, and service (SRV) records. These records ensure proper name resolution within your domain and enable clients to locate domain controllers and other resources.
Verifying and Testing the Newly Created Domain
After completing the domain creation process, it’s crucial to verify and test the newly created domain to ensure its functionality and accessibility. This step helps identify any potential issues and allows you to address them before deploying the domain in a production environment.
To verify and test the newly created domain, follow these steps:
- Ensure that all domain controllers are online and functioning correctly. Check the status of the domain controllers in the “Active Directory Users and Computers” and “Active Directory Sites and Services” tools.
- Test domain controller replication by making changes to a user account or group membership on one domain controller and verifying that the changes are replicated to other domain controllers.
- Verify that DNS resolution is working correctly by performing DNS queries for domain names and verifying that the correct IP addresses are returned.
- Test user authentication and access to shared resources by logging in to a client machine using a domain user account and accessing network resources.
By following these verification and testing steps, you can ensure that your newly created domain is functioning as expected and ready for use in a production environment.
Congratulations! You have successfully completed the step-by-step domain creation process on Windows Server 2019 or 2022. You now have a fully functional domain that can provide centralized user management, resource access control, and enhanced security for your organization. Take advantage of the power and flexibility of Windows Server and unlock the potential of your network!
Keep exploring the various features and capabilities of Windows Server to further enhance your domain and network infrastructure. Stay updated with the latest security patches and best practices to ensure a secure and reliable environment for your users and resources.
Remember, creating and managing a domain requires ongoing maintenance and monitoring. Regularly review and update security policies, user permissions, and group memberships to meet the changing needs of your organization. With continuous attention and optimization, your domain will serve as a solid foundation for your network’s success.
Thank you for joining us on this journey to domain creation on Windows Server 2019 or 2022. We hope this step-by-step guide has empowered you with the knowledge and confidence to create and manage your own domain. Happy domain creation!
See also
Systems Engineering: https://spca.education/category/systems-engineering/
-

Revolutionizing IT: What’s New in Windows Server 2025?
-

Step by Step Domain Creation Process on Windows Server 2019/2022
-
Mastering Windows Server: A Step-by-Step Guide to Domain and Active Directory Services for Beginners and Experts
-
Maximizing Efficiency: A Step-by-Step Guide to Increasing Simultaneous RDP Sessions on Windows Server 2019
-

Microsoft Hyper-V