Creating a website doesn’t have to be a costly endeavor, thanks to the availability of free hosting platforms like WordPress.com. In this guide, we’ll walk you through the process of publishing your free WordPress website on the WordPress hosting platform. This step-by-step tutorial will cover everything from signing up to customizing your site and making it live for the world to see.
1. Signing Up for a WordPress.com Account
The first step in creating your free WordPress website is to sign up for an account on WordPress.com. Visit the WordPress.com website and click on the “Start your website” button. Follow the registration process, providing a valid email address, choosing a username, and setting up a secure password. Once registered, you’ll have access to your WordPress.com dashboard.
2. Selecting a Domain Name
WordPress.com offers free subdomains (e.g., yourname.wordpress.com), but you can also choose to register a custom domain for a more personalized touch. To use a free subdomain, proceed with the given option during the setup. If you decide to purchase a custom domain, you can do so through WordPress.com or connect one you already own.
3. Choosing a WordPress Hosting Plan

WordPress.com offers a range of hosting plans, including a free plan. While the free plan comes with certain limitations, it’s an excellent starting point for beginners. To choose the free plan, navigate to the “Plans” section, select the free option, and follow the prompts to activate your free hosting plan.
4. Exploring the WordPress Dashboard
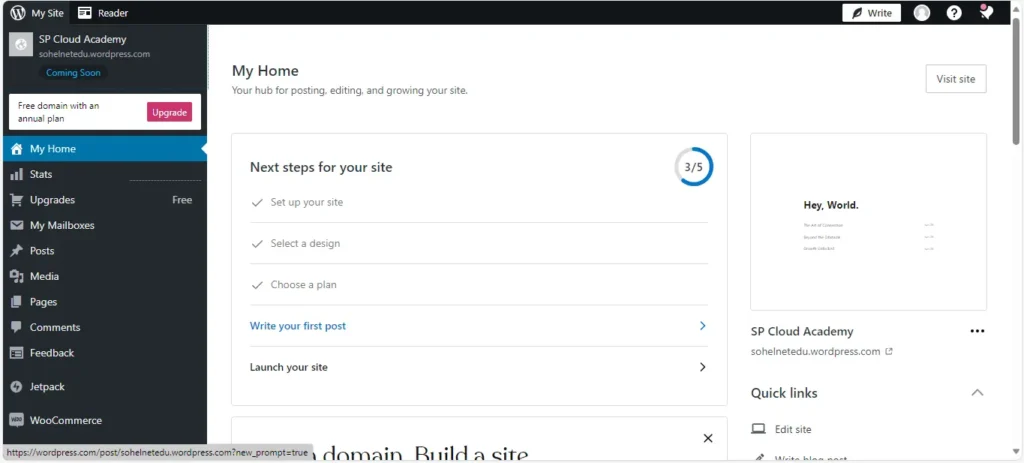
Once your account is set up, explore the WordPress.com dashboard. Familiarize yourself with the various sections, including Site, Design, Customize, and Settings. This dashboard is where you’ll manage your website, customize its appearance, and control its settings.

5. Selecting a Theme
WordPress.com offers a variety of free themes to customize the look and feel of your website. Navigate to the “Design” or “Themes” section in the dashboard to browse and select a theme that aligns with your content and style preferences. Experiment with different themes until you find the one that suits your website’s purpose.
6. Customizing Your Website
Go to the “Customize” section in the dashboard to personalize your website further. Customize elements such as site title, tagline, colors, fonts, and background. WordPress.com provides a user-friendly customization interface that allows you to preview changes before making them live.
7. Creating Your First Pages and Posts
With your website’s basic setup complete, it’s time to add content. Create essential pages such as Home, About Us, and Contact. Use the “Site” or “Pages” section to add new pages and the “Blog” section to create your first blog post. Pay attention to formatting, and use the built-in editor to add text, images, and other media.
8. Understanding Widgets and Menus
Widgets and menus enhance the functionality and navigation of your WordPress website. Explore the “Widgets” section to add elements like recent posts, categories, or a search bar to your sidebar or footer. In the “Menus” section, create a navigation menu to help visitors easily navigate your site.
9. Utilizing Plugins (Limited on Free Plan)
While the free plan on WordPress.com has limitations on plugin usage, you can still explore the available options. Some essential built-in features, such as social media sharing and contact forms, are already included. Upgrade to a premium plan if you require additional plugin functionality.
10. Configuring Settings
Fine-tune your website’s settings by navigating to the “Settings” section in the dashboard. Update general settings like site title, tagline, and timezone. Configure reading settings to determine how your posts are displayed, and set up discussion settings to manage comments on your site.
11. Previewing Your Website
Before making your website live, use the preview option to see how it looks to visitors. This allows you to make any final adjustments and ensure that your website appears as intended.
12. Publishing Your Website
Once you’re satisfied with the design and content of your free WordPress website, it’s time to publish it for the world to see. In the dashboard, find the “Publish” button, and click it to make your website live on the internet.
13. Promoting Your Website
After publishing, promote your website to increase its visibility. Share your content on social media, engage with your audience, and consider participating in relevant online communities. Building a presence beyond your website helps attract visitors and build a community around your content.
14. Understanding WordPress.com Support Resources
WordPress.com offers extensive support resources, including tutorials, forums, and a knowledge base. If you encounter any challenges or have questions about using the platform, explore these resources for assistance.
15. Upgrading for Additional Features
While the free plan is an excellent starting point, consider upgrading to a premium plan if you require more features, customization options, or a custom domain. Premium plans offer added benefits, including increased storage, advanced customization, and the ability to remove WordPress.com ads.
Conclusion
Publishing a free WordPress website on the WordPress hosting platform is a straightforward process that allows you to share your ideas, products, or services with a global audience. By following this step-by-step guide, you’ve set the foundation for a functional and visually appealing website. As your website grows, explore additional features and consider upgrading your plan to unlock more possibilities for customization and expansion. Best of luck on your journey to establishing a successful online presence with WordPress.com!
“Your free WordPress website is more than a page; it’s your online canvas for personal branding and self-expression.”
SP Cloud Academy
FAQs
Frequently Asked Questions (FAQs) – Publishing a Free WordPress Website on WordPress Hosting Platform
1. What is the WordPress hosting platform, and is it free?
WordPress hosting platform, provided by WordPress.com, is a hosting service for WordPress websites. While there’s a free plan with limitations, additional features are available in premium plans.
2. How do I sign up for a free WordPress.com account?
Visit WordPress.com, click “Start your website,” and follow the registration process. Provide a valid email, choose a username, and set a secure password to create your account.
3. Can I use a custom domain for my free WordPress website?
Yes, you can use a free subdomain (e.g., yourname.wordpress.com) or purchase a custom domain through WordPress.com or connect one you already own.
4. Are there any limitations with the free hosting plan?
Yes, the free plan has limitations, such as limited storage space, WordPress.com ads displayed on your site, and restrictions on using external plugins. Consider upgrading for additional features.
5. How do I choose a theme for my free WordPress website?
Navigate to the “Design” or “Themes” section in the dashboard, browse available themes, and select one that aligns with your content and style preferences.
6. Can I customize the appearance of my website?
Yes, use the “Customize” section in the dashboard to personalize your website. You can modify elements like site title, tagline, colors, fonts, and background.
7. How do I add content to my website?
Create pages and posts using the “Site” and “Blog” sections in the dashboard. Use the built-in editor to add text, images, and other media to your content.
8. Can I use plugins on the free hosting plan?
The free plan has limited plugin usage. Some essential features are built-in, but upgrading to a premium plan unlocks more plugin functionality.
9. How do I make my website live for visitors?
Once satisfied with your website’s design and content, find the “Publish” button in the dashboard and click it to make your website live on the internet.
10. How can I promote my free WordPress website?
Promote your website by sharing content on social media, engaging with your audience, and participating in relevant online communities. Building a presence beyond your site increases visibility.
11. What support resources are available on WordPress.com?
WordPress.com offers extensive support resources, including tutorials, forums, and a knowledge base. Explore these resources for assistance with any challenges or questions.
12. Can I upgrade my plan for more features?
Yes, consider upgrading to a premium plan for additional features, increased storage, advanced customization options, and the ability to remove WordPress.com ads.
See Also
WordPress Local Hosting: https://spca.education/a-step-by-step-guide-to-setting-up-a-local-wordpress-web-hosting-server-on-your-pc/
-

The Power of Professional Communities: Why Joining One Can Transform Your Life
-

Promoting Blog with Pinterest: A Comprehensive Guide for 2025
-

Web3 and the Future of Decentralized Internet
-

How AI is Revolutionizing Web Development: Skills You Need to Stay Ahead
-

The Ultimate Guide to Solo Tourism: How to Travel the World on Your Own
-

How to Write an Amazing Article: Proven Techniques for Success

I like the helpful information you provide to your articles.
I will bookmark your weblog and take a look at once more right here regularly.
I’m fairly sure I will learn many new stuff proper here!
Good luck for the next!